Sunday 29 September 2013

placemat envelope purse with handle

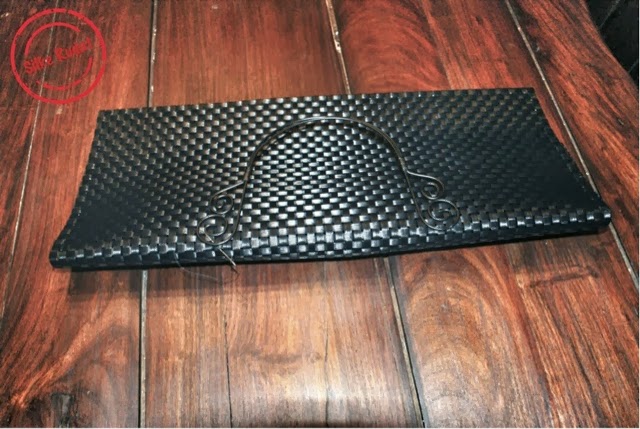
and another placemat handbag...basically a fusion of two handbags, i created previously...same placemats as the black lunchbag purse and same handle as the blue handbag with baroque handle and matching brooch.

...the difference is the envelope like shape of the handbag and the huge button on top of the release.

as always the "pattern" is pretty simple...and the look of the purse depends on the placemat you choose to use.


this is what you need


- two placemats

- one fancy handbag handle

- velcro

- one big button

- scissors

- paper clips

- sewing machine

- sewing needle

- thread


this is what you have to do


- cut three quarter of one of the placemats in lengthsways


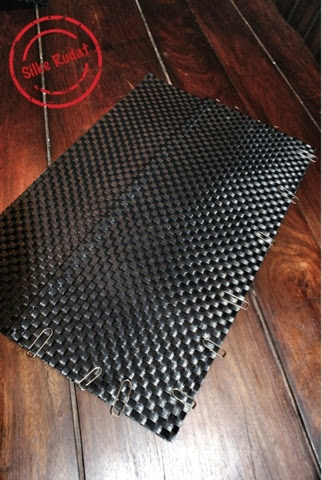
- place it on top of the other placemat

- keep all three sides in place using paper clips


- sew along the edges


- folder over the remaining part of the placemat

- attach the handle on top of the turn-over


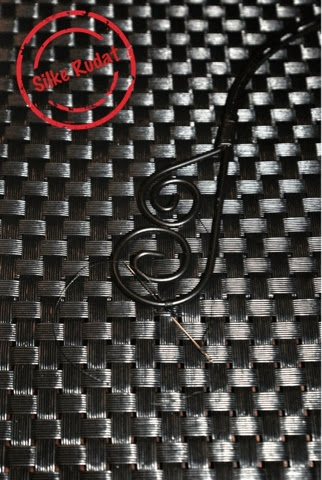
- hand stitch the handle


- attach the velcro to the inner side to the bag to fasten the bag


- sew a button on the outer side of the bag to cover the velcro stitches


Tuesday 24 September 2013

wool wrapped glass bottle ... a cosy vase

...autmn...pure cosiness...the weather outside just calls for staying inside and making it ourselves comfortable...so it is about time for some fall craft.

apart from being too lazy to return my glass bottles and running out of space for spare yarn...i always liked the idea of yarn-wrapped-bottle-vases...so...i just gave it a go.


this is what you need


- empty bottle

- yarn

- hot glue gun

- scissors


this is what you have to do


- apply hot glue along the bottom rim 

- place a string of yarn over it


- tightly wrap the yarn around and around


- stop every few rows to add a dap of hot glue to keep the yarn in place


- when you reached the top, just cut the yarn and seal it with a last dap of hot glue


- you may start at the top of the bottle

- apply some hot glue just under the edge

- continue down the bottle until you reach the bottom

- apply another small dap of glue along the base 

- once the yarn is set, snip the end


- another way to yarn-wrap bottle is to use double-sided tape instead of hot glue


- apply the tape to the bottle


- cover the entire bottle with the tape


- peel of the backing of the bottom layer


- place the yarn over the tape


- repeat with the next layer of the tape


- keep removing and applying


- until you reach the top of the bottle


- place a small piece of the tape inside the top of the bottle and secure the end of the yarn


- decorate the vase with a flower 


 here i got my inspiration from

Thursday 19 September 2013

bread and salt... a housewarming tradition

...i was waiting to do a bread-and-salt post for such a long time...and finally my friend cindy moved houses and i invited myself over...

giving bread and salt to someone who starts a new life in a new home is such a beautiful tradition...bread...so there will be no hunger...salt...to add flavour to life.

and it is a useful gift for anyone, anyways...who does not need bread and salt.

...so that's about the thought behind the gift...now the creative part...bread and salt...hmmh...it should be delicious, appealing, a little bit special and with that personal touch...

i was pretty much sure about the bread dough...my favourite wholemeal spelt walnut bread...and that it should be muffin like instead of a bread loaf...but what's about the salt...??? how to present (and carry) the salt...???

while browsing my own stock of "houshold-thingies"...i came up with two options...and i like both of them very much...


a glass jar with a tiny wooden spoon...


...and a miniature zinc bucket with a small zinc shovel


the recipe for the wholemeal-spelt-walnut-bread-muffins is actually a thermomix recipe, but if you use wholemeal flour or buy grind grain in a drugstore...you should be fine with any other food processor.


this is what you need


- 500g spelt grain

- 42g fresh yeast

- 100g walnuts

- 50g sunflower seeds and pumpkin seeds

- 30g balsamico vinegar

- two teaspoon salt

- 450g lukewarm water 


this is what you have to do


thermommix

- grind 250g spelt on speed 10 for 60 seconds and set aside

- repeat with the remaining 250g of spelt

- place all ingredients into your thermomix and knead for 3 minutes using knead cycle and the spatula

- pour (yes, the dough is quite "gluey") into muffin moulds

- bake in a preheated oven at 200 degrees celcius for 25 to 30 minutes.

- if the muffins turn too dark while still baking, cover them with aluminium foil until ready baked

- if you prefer to bake a loaf of bread, please adjust the baking time to 45 to 50 minutes

- enjoy


traditional food processor

- replace the grind grain with wholemeal flour

- you might have to raise the dough for a while before pouring into the mould 


the original recipe in german can be found here

http://www.rezeptwelt.de/rezepte/vollkorn-nu%C3%9Fbrot/24709

Thursday 5 September 2013

white chocolate toffee cake ball variations

cake balls...i am still in love with those tiny little sweet treats...

...it was just time for some changes...the traditional crumbled cake and cream cheese needed some competition.

for a lighter and less messy version, i bought myself some silicone cake ball moulds...i was a little bit tempted to go for the cake pop maker...but it would have been just another "something maker", which takes up a lot of space...i do need that kitchen space for all other kitchen gadgets to come.

...the first time i made them, they turned out really pretty, so i thought i am going to make them again and post the results...hahahaha...

this time, i did not pay attention to the fact, that the silicone moulds are not cake tins and that i have to adjust the baking time accordingly..i did not.

...as a result, i managed to make seven balls, only and and a lot of crumbles.
...you might have guessed, what i did with the cake crumbles...yes...i made some traditionally cake pops, too...oh my god...they were so yummy...and they tasted somehow like white chocolate twix.

for the baked cake balls i actually used the recipe of my anniversary cake, which will be found here


 and they should be baked for 25 minutes.


a combination of the cake balls...baked, not baked...chocolate covered, not covered...decorated with brittles, not decorated...and i loved all of them...


these are the seven baked cake balls, by the way...quite pretty though


this is what you need for the traditonal cake balls


- some extra chopped soft toffees

- 1 cup icing sugar

- 2 tablespoon softened butter

- 2 tablespoon cream

- 1/2 teaspoon vanilla extract

- pinch of salt

- white chocolate coating

- brittle to decorate


this is what you have to do


butter cream

- beat together butter and icing sugar

- add vanilla, salt and cream

- mix until the butter cream has reached the consistency you prefer

- stir in cake crumble and chopped toffees step by step until the mixture is firm enough
  ( you might need far less of the butter cream )

- roll the mixture into small balls 

- place them in the freezer for about half an hour

- melt chocolate bark in a double boiler

- dip the balls into the chocolate and let them dry

- have fun and enjoy