Tuesday 30 April 2013

white chocolate coconut balls

...white chocolate is always delicious...in combination with coconut flakes and coconut bark it is just devine...

they do taste like summer...not that summer has arrived in germany already...we are getting there...enjoying each and every sunny day...

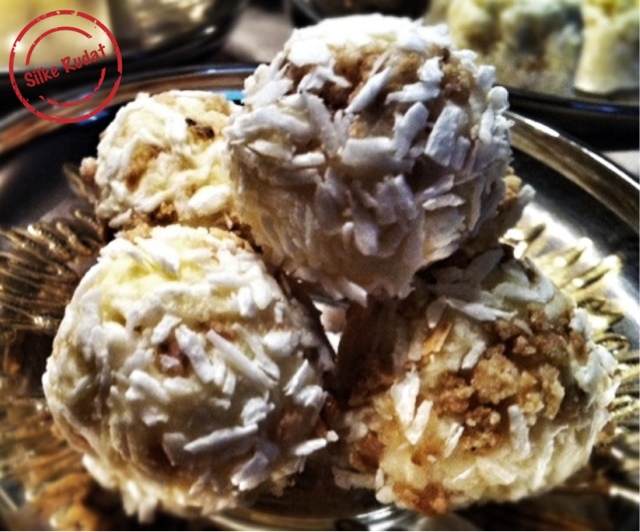
...so make yourself some white chocolate coconut balls...and the sun will be shining in your kitchen.

enjoy...


this is what you need


- 300g grounded white chocolate

- 100g icing sugar

- 2 tsp vanilla extract

- 100g butter

- 4 tbsp orange juice

- 175g coconut flakes

- 75g coconut brittle

- blanched almonds


this is what you have to do


- beat the butter until light and fluffy adding icing sugar and vanilla extract

- add chocolate, orange juice and 100g of coconut flakes

- knead all the ingredients to form a homogenous mixture

- shape little balls and insert one whole almond in the middle of each ball

- mix the remainng coconut flakes and the coconut brittle

- cover balls with the coconut mixture

- let them rest for one day

- enjoy


inspiration for the recipe

http://www.kochbar.de/rezept/137492/Pralinen-Raffaello.html

Monday 22 April 2013

five-fold variation of my candle stand candy jars


...here it is...something i was really looking forward to make...my five-fold variation of the candle stand candy jars.


i replaced the candle stand in my bathroom with a much bigger one and the old one just did not match with the colour scheme of any other rooms than the bathroom...and i am not that candle person...i don't really mind the decoration, but for me there is no need to light candles everyday...or any day.


...anyhow...i wanted to repurpose it into another candy jar...or actually five candy jars...

my apartment has a slight oriental touch...okay more than slight...sorry, having lived in dubai for six years did leave marks...and i think after my treatment the candle stand goes candy jars fits in perfectly.

I found a metal effects rust paint in a dark brown and just had to apply it with a sponge and now it looks really really shabbily chic.


the tutorial for the plain candy jars will be found here.

http://silkerudat.blogspot.de/2013/03/candlestick-candy-jar.html


Friday 19 April 2013

lacy clipboard

i hope it is not getting too boring, because it is another clipboard...but...it is more about the technique than about the clipboard itself...and another but...it turned out sooo beautiful...so i could not resist.

...i did a similar project before, using spraypaint and lace fabric...this time i did not have the right colour of sprayaint on hand and used a lacy plastic placemat, as i really like the pattern.

it is such a great way to beautify nearly anything with an even surface.

have a look and enjoy the tutorial.


this is what you need


- plain clipboard

- lacy fabric

- paint

- soft sponge

- adhesive tape

- scissors


this is what you have to do


- choose a nice excerpt of the fabric and the position on the clipboard


- secure the fabric on the backside on the board as tight as possible


- apply some paint onto the sponge


- start dabbing the colour ono the farbic, trying to apply the paint evenly


- remove the fabric carefully


- optional you can secure the lace onto the table


- enjoy the beautiful pattern


this is what inspired me


http://creativityindiyyoucandoit.blogspot.de/2012/10/from-trash-to-something-pretty.html


Saturday 13 April 2013

sparkling clipboard

...to do things in a big way...to not take half-measures...i think that pretty much describes those sparkling clipboards...and not only those clipboards.

aren't they brilliant...???

i fell head over heels in love with this project, when i spotted it on pinterest.

...the most challenging part was to get all those sparkling diamonds and pearls without spending a fortune...but at the end i managed  quite well.


here you can see how they turned out and what i had to do.

i hope you enjoy it.


this is what you need


- clipboard with a large clip


- necklaces, earrings, buttons...anything that sparkles

- pair of pliers

- hot glue gun

- adhesive tape roll( to elevate the clip, while gluing )


this is what you have to do


- disassemble the necklaces, earrings and buttons


- lift the clip with a adhesive tape roll


- arrange the single pieces on the large clip


 - adhere the gems with hotglue and let everything dry


here i got the inspiration from


http://teresacollins.typepad.com/teresa_collins/2011/03/good-things-utah-tv-blingage-clipboards.html

Wednesday 10 April 2013

sunflower seed set for kids

...looking for a small gift for a three and a half year old little boy can be sooo difficult.

it should be something cool, fun, entertaining and it would be great if it could be educational as well...and the most diffucult part...he should not have this special something already.

...browsing the web for some inspiration...i found a few sunflower seeding sets for kids and started liking the idea...unfortunately most of the sets just didn't look that nice...

but...seeds, soil, container...i should be able to create a set myself...and i did.

i really like the result and i really hope my little nephew mika likes it, too.


this is what i needed


- zinc container

- soil

- sunflowerseeds

- fabric sunflower

- wooden letters

- small magnets

- small transparent plastic bags with clips


this is what i did


- painted the wooden letters in metallic silver colour

- glued the small magnets onto the letters

- attached the letters to the zinc container

- filled two bags with soil, closed the bags and placed them in the zinc container

- added the sunflower seeds

- wrapped the decorative sunflower on one of the handles of the container

- enjoyed the result


i very much love the idea of this present...kids can immeately start seeding the sunflower, they have to water it regularly, can watch them grow, use the magnetic letters their own memoboard and reuse the container.


Friday 5 April 2013

rustic wooden board with fancy hooks

who could have thought that japanese door hooks are simply not made for german doors...i did not and learnt it the hard way, when i tried to mount my new door hooks, bought in a japanese shop in dubai.

...i had to come up with an idea how to use the hooks, because i really fell in love with those blackish diamond like once.

and here it is...my rustic wooden board with a little bit of bling bling.


this is what you need


- rustic wood boards

- larger board as back surface

- door hooks

- wood stain paint

- brush

- ribbon

- stapler

- hotglue gun and hotglue sticks

- hammer and nails

- felt glides


this is what you have to do


- paint the wood boards with wood stain paint and let them dry


- paint your back surface and let it dry


- cut the ribbon


- attach the ribbon on top of the back surface board as the hanging


- glue the rustic boards onto the larger board


- secure it with nails


- cover the nails with felt glides to protect your door from scratches


- attach the hooks


- hang it on the door or on the wall

- use it as coat hanger or handbag stowage or key hoder


- enjoy it